I have been trying out different ways to make a low carb pizza using our whole wheat sourdough starter. Frank and I switched to eating low carb in December 2014, and plan to continue eating that way forever. We have both lost around 45 pounds since we changed our eating habits, and this has changed our lives for the better. Because of this change, I have been experimenting with different low carb meals. Some are a success, some aren't and some need a little more tweaking.
 For the crust, I used whole wheat sourdough starter. I put olive oil on the plates, spread out some starter, then baked it for about 15 minutes while I got the toppings ready. I wanted it to be cooked before I added any sauce, so it wouldn't be too wet.
I used some of the tomato sauce we canned a few years ago. I'm trying to use up the last few jars. To the sauce I added salt, pepper, basil, oregano, parsley and some of the garlic we canned a few months back.
The garlic has worked out very well. We have already used one pint and opened a second. I'm thinking we may need to can another batch of 16 pints.
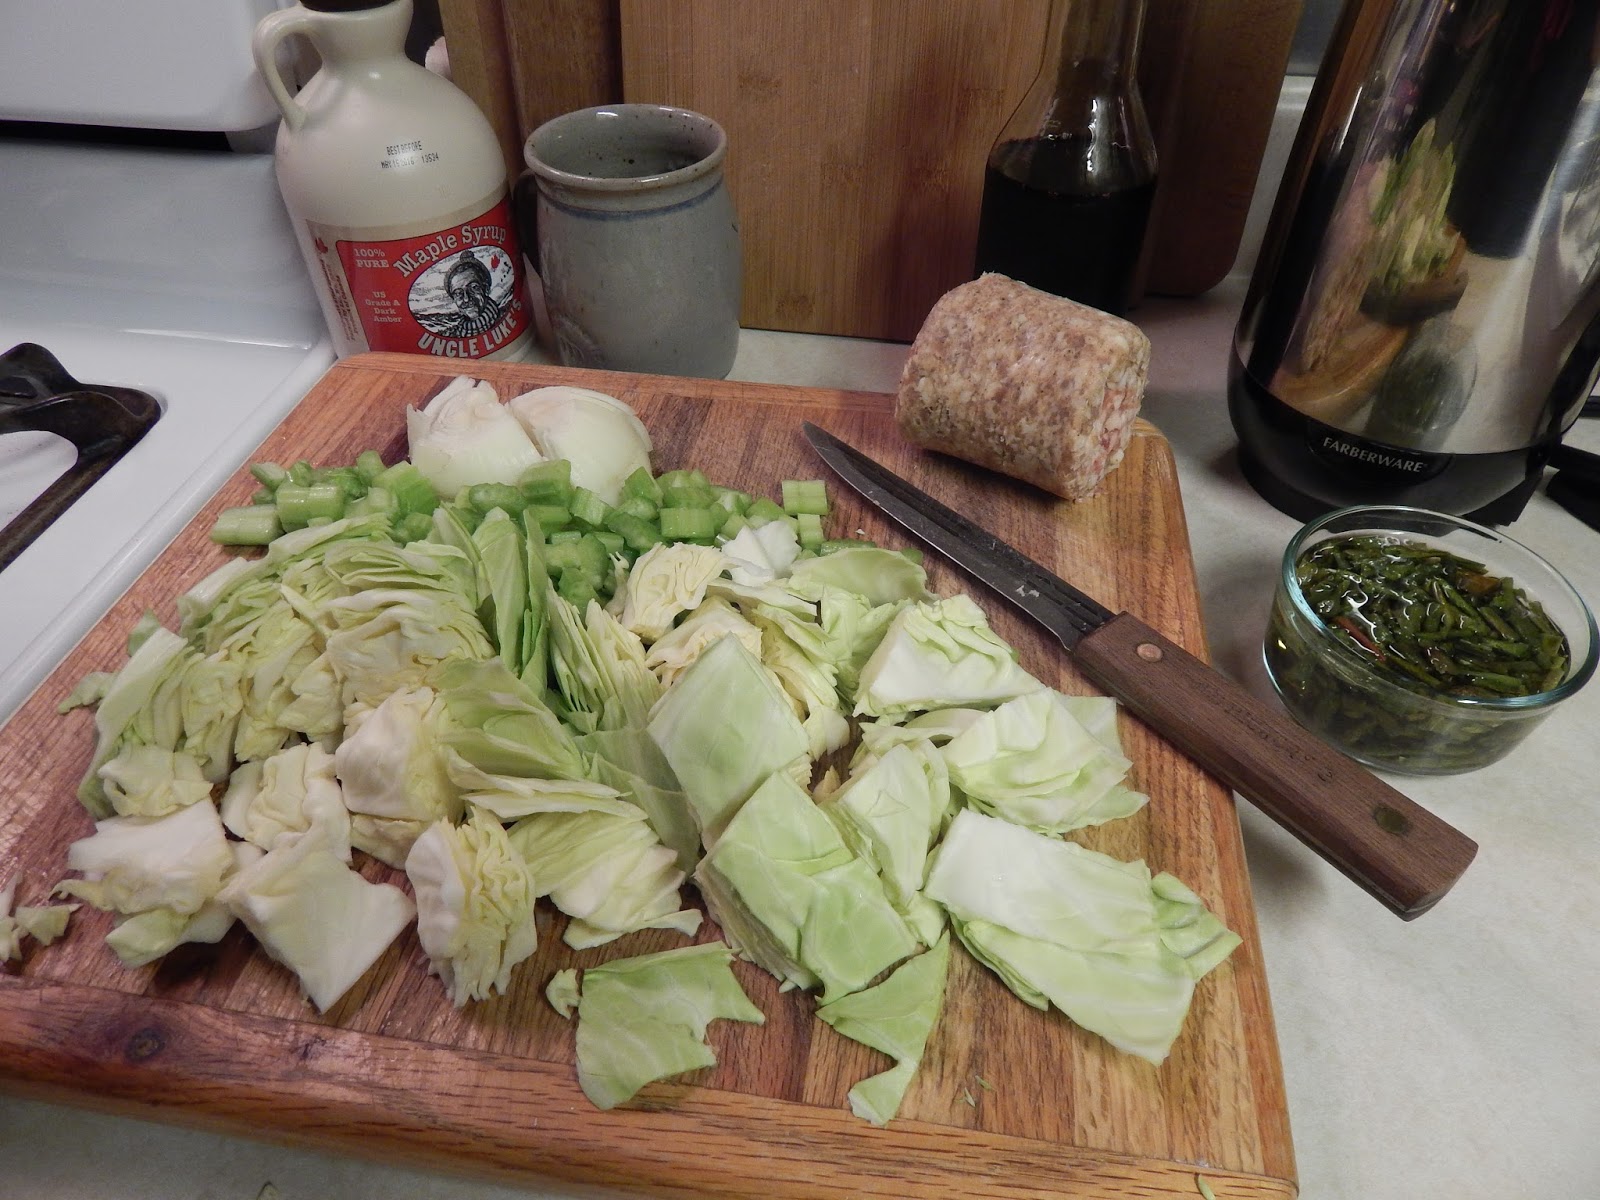
I layered tomato sauce, browned sausage, onions, sweet peppers from the garden and some of our shredded mozzarella.
 After it was constructed, the pizza baked for another 10 minutes at 450*.
Our side dish this evening was a bowl of collard and beet greens picked from the garden. We think the turnip greens are better, but collard greens are just fine, too.
The olive oil didn't work very well, and the 'crust' stuck a little. It was also softer or moister than I prefer, but the flavor was good. I think I'll have to try making a dough for the crust sometime, but I'll need to make it in the morning for the evening meal. That will give time for the starter to digest the carbohydrates in the whole wheat flour, which not only reduces the carb load, but releases many useful vitamins and minerals.
Now the final version. What Frank thought. "You can live on it. Maybe after it's tweaked, you could live on it happily."
There are so many different ways to eat healthy. We try to find ways to grow or make our own with everything we eat. There are many, many low carb products on the market, but if it is feasible for us to make our own, we would much rather do so. It's part of choosing. As long as we still have the freedom to choose, we choose not to participate in the processed, prepackaged, chemicalized items corporate America puts on the grocery shelves and calls food. It takes time and effort to learn, produce, and prepare real food, but it is worth it.
Until next time - Fern
After it was constructed, the pizza baked for another 10 minutes at 450*.
Our side dish this evening was a bowl of collard and beet greens picked from the garden. We think the turnip greens are better, but collard greens are just fine, too.
The olive oil didn't work very well, and the 'crust' stuck a little. It was also softer or moister than I prefer, but the flavor was good. I think I'll have to try making a dough for the crust sometime, but I'll need to make it in the morning for the evening meal. That will give time for the starter to digest the carbohydrates in the whole wheat flour, which not only reduces the carb load, but releases many useful vitamins and minerals.
Now the final version. What Frank thought. "You can live on it. Maybe after it's tweaked, you could live on it happily."
There are so many different ways to eat healthy. We try to find ways to grow or make our own with everything we eat. There are many, many low carb products on the market, but if it is feasible for us to make our own, we would much rather do so. It's part of choosing. As long as we still have the freedom to choose, we choose not to participate in the processed, prepackaged, chemicalized items corporate America puts on the grocery shelves and calls food. It takes time and effort to learn, produce, and prepare real food, but it is worth it.
Until next time - Fern
I was trying to dream up something good for supper the other day. You know what that is like, right? I had a few ingredients on hand, so I set about thinking, "Hmmm....what would be good and healthy? Or even just good!"
Many years ago they came out with a taco salad shell that you could bake and fill. It was a very light, crusty shell that tasted very good. I haven't bought them in many years. While we were in Alaska I tried making taco salad shells from store bought flour tortillas. It was okay, but not that great. Well, I decided to try making my own flour tortillas, then baking them into the salad shell. And, you know what? They were really good. Frank really liked them which gives them a place in the, "Let's remember that and make them again." category.
First I made up a regular batch of flour tortillas using one cup of flour. If I were going to make tortillas to fill and roll up, I would split this recipe into four pieces of dough. But since I wanted to make taco salad shells big enough to hold a decent amount of ingredients, I only split it into two pieces.
I got out a cookie sheet and two regular cereal bowls, coated the outside of the bowls with shortening and rolled out the first shell. I put it directly on the bowl, then realized that just wouldn't work. So I took it off of the bowl and cooked it in the skillet just long enough to give it some shape, but not as long as if we were going to eat it.
Then I put it back on the bowl and gave it a little shape. After doing the same thing for the second bowl, I baked them at 400 degrees for 10 minutes.
In the meantime, I browned up a bit of sausage, and cut up some lettuce and onions. To the table I added some of our jalapeno peppers, salsa and a bottle of ranch dressing. Frank and I tend to build our salads in different orders, but they both taste great.
Good to the last bite.
Until next time - Fern
Well, it's another night and another meal. What will I fix this time? We have a head of cabbage that sounds good, so what can I put with it?
I have some sausage thawed out, and then there is some celery, part of an onion, some of the potatoes we grew and some of the peppers we dehydrated. I put them in hot water to rehydrate them for this meal. That will do. This is another one of those meals that you can add whatever you like, in whatever quantity you need to feed your family.
For this dish I started off with a few tablespoons of oil in my cast iron wok. I love this pan, but it is heavy. As I get older, I have to take the weight of things into account. It will come in real handy in a hail storm. If you think Frank's tin foil cap is a good deal, this will work much better. Once the wok is good and hot I added a few potatoes, a good tablespoon of minced garlic, salt and pepper.
After the potatoes had cooked for a bit, I added the onions and celery.
While they were cooking, I cut up the sausage into bite sized chunks. Then added them to the mix.
After the sausage had cooked for a while and was almost done, I added the rehydrated peppers. I wasn't too sure how these would work out since I haven't dried peppers before. They were just fine, looked a little weird, but tasted fine. Last summer was the first time we ever dehydrated anything so I am still learning to add these ingredients into the meals I cook.
The cabbage was the last vegetable to be added. With it I poured on a generous dose of soy sauce.
At this point, you can cook this down to the desired texture or 'doneness'. When I first starting eating cabbage, I was an adult, and I liked it cooked until it was very limp. That way it didn't taste much like cabbage. There are many things I began eating as an adult that I wouldn't touch as a child. Now, I don't cook cabbage near as long and I put a lot more in a dish. It's good stuff.
This made a great meal with leftovers for lunch the next day. I have found over the years that discovering different ways to use the same ingredients increases our enjoyment and likelihood of eating those particular ingredients. When the time comes that we eat only what we have on hand or can grow or barter for, this will be a valuable skill. So, increase your creativity using what you have on hand. This will lead you to keep on hand what you like and can stretch the farthest. Now if only those little cabbages in the window were big enough to eat....
Until next time - Fern
One of the simple, basic things I learned to fix when we lived in bush Alaska was flour tortillas. It took me a while before they were edible, but now I am pretty consistent. We have tried them with whole wheat flour and a mixture of white and wheat flour. When the time comes that we are dependent upon whole wheat flour, that is what I will use. But for now, we prefer them made from white flour. So here they are.
I make them fresh for a meal without making any extras. I have tried making extras and keeping them in the frig, which is okay. But, we prefer them fresh and they are quick to make. I only make four at a time and they aren't very big, so if your family requires more, you will have to increase the recipe accordingly.
Start off with 1 cup of flour.
Add 1/2 tsp. salt and 1/4 tsp. baking powder.
For the liquid add 2 tbsp.
olive oil and 1/3 c. water.
Mix well. The dough will be rather moist.
Turn it out onto a floured surface, knead and add flour as needed until it is just barely not sticky. That sounds odd, but I have added too much flour before and the tortillas turn out rather stiff.
So just get the dough to where it won't stick to the counter or rolling pin. Still put a little flour on the counter when you roll them out to help prevent sticking.
Now to cook them. The problem I initially had was not keeping the skillet hot enough and cooking them too long. So, put a little oil in the skillet, get it good and hot, then put in a tortilla. They don't need long to cook on each side, maybe 45 seconds to a minute. Flip them over, cook the other side, then place them in a towel or tortilla bowl to retain the remaining moisture and keep them warm while you cook the rest.
 We like to have one with only butter and salt. They are great. This is one of the ways Frank ate them as a child.
Then I put together a variety of things to eat with them. It just depends on what we have on hand. Sometimes I just scramble up a few eggs. The possibilities are endless. This time I browned up some sausage, used some of the lettuce and green onions left from the layered salad, then got out some salsa. It was great!
This is one of those simple things that I definitely didn't succeed at when I first (and second and third and fourth) tried it. What's the old saying, "If at first you don't succeed, try, try again."? Well, I finally got it right and can have everything ready at once, most of the time. Try something new for your family. Make something from scratch instead of buying it ready made. The more you teach yourself, the better off you will be, the more confident you will be, when all you can depend upon is yourself. It's coming. Practice everyday, either mentally or physically, or both. You're in my prayers.
Until next time - Fern
We like to have one with only butter and salt. They are great. This is one of the ways Frank ate them as a child.
Then I put together a variety of things to eat with them. It just depends on what we have on hand. Sometimes I just scramble up a few eggs. The possibilities are endless. This time I browned up some sausage, used some of the lettuce and green onions left from the layered salad, then got out some salsa. It was great!
This is one of those simple things that I definitely didn't succeed at when I first (and second and third and fourth) tried it. What's the old saying, "If at first you don't succeed, try, try again."? Well, I finally got it right and can have everything ready at once, most of the time. Try something new for your family. Make something from scratch instead of buying it ready made. The more you teach yourself, the better off you will be, the more confident you will be, when all you can depend upon is yourself. It's coming. Practice everyday, either mentally or physically, or both. You're in my prayers.
Until next time - Fern
A few days ago we made our first batch of tomato sauce (which was really great! It was great to have a dream come true and it tasted good to boot!). We had a little over a quart left over after we filled the canner and decided not to run the canner for a second batch with that little amount. So the next question was, what do we make with the leftover sauce?
Since I am back to work it is nice to have some prepared meals ready and in the freezer for those extra busy days. We like something we can take out and pop in the microwave and heat up quickly. We thought about lasagna, but I don't have any cottage cheese made, so we decided on pizza. I have shown how I make pizza before.This time I just tripled the recipe. I got started later than planned on this Friday evening after a long, busy week, but the grape fiasco
took more time than we planned or wanted it to. By the time I got the
pizzas close to cooking, it was already time to do the chores and feed
the animals.
We were able to use several home grown or homemade items in our pizza which increases our enjoyment of this meal. The mozzarella was made last summer and frozen. The peppers were fresh picked from the garden, I made the dough from scratch and there is our beautiful tomato sauce. We used this roll of sausage that we buy from a young lady at church. The agriculture programs at schools in this neck of the woods sell sausage and bacon each year as a fund raiser and have for years and years. It is good and helps support the local kids so we are glad to buy it.
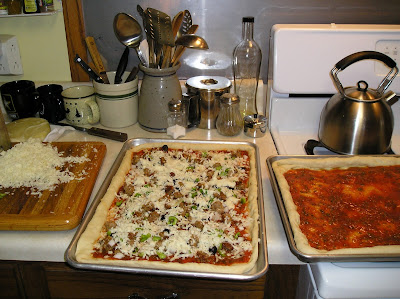
So, I got two of the pizzas put together while Frank got the items we needed for chores ready. I put the first one in the oven - due to the size of the pans, I can only cook one at a time. That gave us 25 minutes to do the chores and get back to the house, so off we went. When we got back we still had a few minutes left on the timer, so I started to put together pizza number three. Pizza number one came out and number two went in. While pizza number one was cooling a bit, I finished up number three and cleaned up my mess. I am really good at making messes when I cook!
Then we sat down to a late 7:30 dinner while pizza number two was still cooking. Just about the time number two was finished, so were we and I could start pizza number three cooking. While it was cooking I went and started the post on the grape fiasco.

 By the time they were all cooked, bagged and ready to be chilled before freezing and the post was written and published it was 9:30 pm - the end of a long 16 1/2 hour day. A very good productive day filled with laughing, learning children, a wonderful peaceful home and good home cooked food. I couldn't asked to be more blessed!
Until next time - Fern
By the time they were all cooked, bagged and ready to be chilled before freezing and the post was written and published it was 9:30 pm - the end of a long 16 1/2 hour day. A very good productive day filled with laughing, learning children, a wonderful peaceful home and good home cooked food. I couldn't asked to be more blessed!
Until next time - Fern
You know that traditional green bean casserole that we have all been making for years? Well, a long time ago Frank came up with his own version of green bean casserole. And since he is a guy and has been trying to convince me for years that he is a carnivore (he eats meat) not an omnivore (he doesn't like to eat fruit and vegetables - except potatoes - potato chips and fried potatoes), guess what he added to the green bean casserole recipe? Meat, of course. Just about any ground meat will do, but it's best with sausage. We have never met a man that doesn't like it. So, here is Frank's Green Bean Casserole.
Start with green beans. If you are making a 13 x 9 casserole you will need 4 cans or pints of green beans. I cooked these beans from our garden on Saturday for this casserole. This is the first time I have used our homegrown green beans for this recipe.
While I am collecting all of the ingredients, I brown the sausage. This is about a pound and a half. We buy two pound rolls from the local kids in the agricultural programs at school. They sell it once a year as a fundraiser.
For each two pints of green beans you use, you need one can of cream of mushroom soup. I have thought about trying to make my own, but have never taken the time. We don't eat it very often, but it is very convenient. We buy the French's Fried Onions in the big bag at the warehouse market. We always used more than the recipe called for so this makes it even easier. Don't even try to read the ingredients.
Remember the squash I canned? I thought it would go well in this recipe, so I added two pints. I didn't tell Frank first, though, because it falls in the omnivore category.
Add the mushroom soup.....
then I fill each can half full of milk to swish out the remaining soup.
Add the squash.....
or not.
Add the meat.....
I use this slotted scoop to drain out some of the grease.

To this I add 3 cups of fried onions.
Mix well and pour in baking dish.
 Put a layer of fried onions on top. This is where you can put as many as you like.
Bake at 350 degrees for about 45 minutes depending upon your ingredients and how big your pan is. This time I used my 14 x 10 for a large casserole to take to church for our luncheon. So I baked it for an hour.
 Here is my trusty casserole carrier.
 This casserole is easy to make, transport and share. We all eat lunch at church once a month right after the service. It is a good time of fellowship and a great place to get new recipes. This time we came home with some leftovers. Sometimes the pan is empty. The squash is a good addition to this casserole. I will have to see what else I can use it in. I am glad I have it on the shelf to add to recipes along the way. It is nutritious and we grew it. That always adds to the flavor. Frank even liked it.
Until next time - Fern

 For the crust, I used whole wheat sourdough starter. I put olive oil on the plates, spread out some starter, then baked it for about 15 minutes while I got the toppings ready. I wanted it to be cooked before I added any sauce, so it wouldn't be too wet.