The Road Home

The Road Home
There is no place like home.
Showing posts with label egg turner. Show all posts

Tuesday, March 4, 2014

Baby Chicks, 3 Days Left

Hello, Frank here.

Hi everybody. Today is Tuesday, the eggs have been in the incubator for two weeks and four days. Today I'm going to remove the automatic egg turner. There are some things to take into consideration when doing this. But, before we get into this, some things that have occurred since the last update.


The temperature of the eggs started to rise a little bit at the two week period. There is nothing unusual about the fluctuation in temperature, but they stayed a little bit high. So, I lowered the temperature a little bit. This particular incubator has an extremely sensitive thermostat. When I started the eggs originally, I started early in the morning so I would have all day to set the temperature. I did the same with this temperature adjustment, I did it in the morning.


I've also found that with this particular batch of eggs, I need to fill the water troughs up every two days. Don't ever let your water troughs go dry. Yes, there are much more sophisticated hydration systems. This is just the way this incubator operates.

The expected hatch date is Friday and Saturday, and maybe a few stragglers on Sunday. But, hatch or not, the unhatched eggs will be discarded Sunday night. We're getting close here, three days away. There are a few things I'm going to remind you about that you need to have. Some type of a brooder, feed, water and the equipment to deliver them, a source of heat in a draft free environment. It needs to be dog and cat proof. This applies whether you're hatching your own, or you've got chicks coming from a hatchery.


Now, back to removing the turner. Folks, this is the place where you want to pay attention. It's easy to shift your incubator when you do this. It's easy to drop an egg. I'm going to talk you through it right now. Follow me here. Always know where your cords are. There is a cord going to the incubator and a cord going to the turner. Do not be standing on one of them, no joke, I've done it more than once.


Remove the top portion of the incubator and set it down flat.


Before you remove the top, make sure the turner is in an almost flat position where there is no angle to the eggs. Read that last sentence again. 
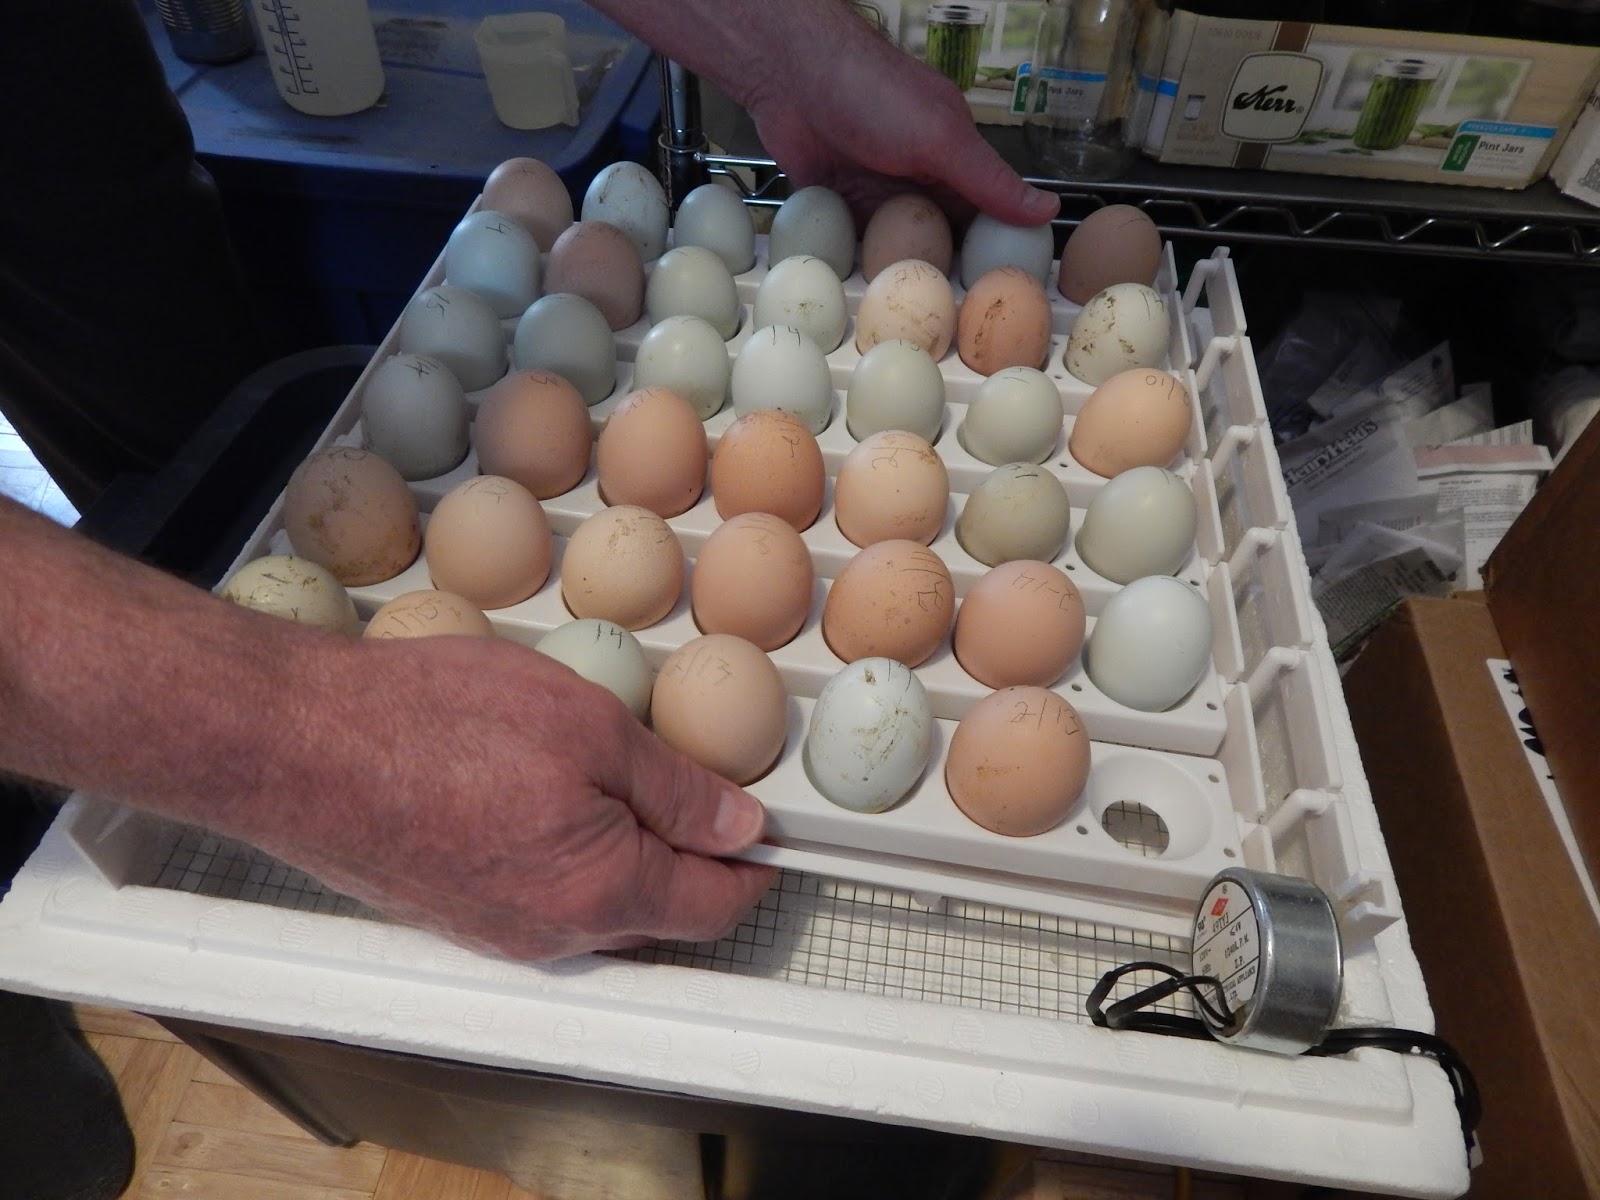
 
Okay, the top is off, you're not standing on one of the cords, very gently lift out the turner. Do not lift it by the egg trays, or you might find yourself holding an egg tray and the rest are on the floor. Set the turner down.


 At this stage you should have unplugged the turner from the electrical outlet. 


This is not the place to drop an egg. Grasp each egg and put it back into the incubator. I would start by putting a couple in each corner, because these guys like to roll and you don't want to crack an egg at this stage.

While you have your turner out and before you put any eggs in, fill up your water troughs. Now continue putting in all of your eggs. Don't get in a hurry. If any eggs have any gooey type substance coming out of them, discard them quickly. They will not hatch.


Now, all of your eggs are back in the incubator. You've got the water troughs filled up. It's three days to hatch. Put the top back on and make sure it's good and square and solid. Wait about an hour and check your temperature. Go ahead and put your turner back in the box that you saved. If it needs to be cleaned, and it probably won't, but if it does, just follow the instructions on how to clean them.


You are probably going to have to adjust your temperature up a little bit. The reason being, the turner motor produces heat, and it's not there now. And if you don't believe me, when you first take your turner out, reach down and grab that little motor. As my grandmother used to say, "I bet you won't do that again!" That little motor is hot.


The next three days, do not turn the eggs. Keep a very close eye on the temperature and humidity. If your incubator has a couple of plugs you can remove when your humidity increases, then remove the plugs. Because when these guys start hatching, you're going to have a sharp increase in moisture, which is not necessarily bad. But you want your baby chicks to dry also. 

If you have one chick hatch real early, then just leave it in the incubator. It's not going anywhere. Start removing baby chicks from the incubator when you have five or six that are dry and ready to go. They're going to go in the brooder that you have ready and you're going to need to give them their first drink. If you need a review, now is a good time to read back because you still have a couple of days.

2012
When you take that first batch of baby chicks out, it's okay to go ahead and remove the old egg shells. Do this quickly. If you have other birds that have just hatched and are still wet, you don't want to chill them. If a bird is still attached to it's shell in any form or fashion, then don't remove it. I'm not talking about a little piece of broken shell on it's body somewhere. At this stage you also need to be prepared to discard bad chicks. As mentioned before, I flush mine. This may not be a thing to show little kids. Okay?

So, time is near. Watch your temperature. Enjoy the birds hatching out. Do not help them out of their shell, especially if it's getting to be late Sunday evening and a bird has almost hatched and it's been that way for the whole day. Then you need to discard that bird. There are people that would disagree with what I just said. But you need to discard that bird.


Okay. I've got baby chicks coming from the hatchery that should hatch about the same time as the ones I'm hatching at home. The eggs are hatching are from my Easter Egg chickens and from a friend of our that has an assortment of mixed breeds. My birds are going to hatch Friday and Saturday. About Thursday I will be tapping on the incubator and cheeping at the birds. Not clucking but cheeping. Cheeping is baby bird talk. Clucking is big bird talk. Hope you enjoy these little reminders.


We'll talk more later. Soon. Frank


Saturday, February 15, 2014

Eggs Incubating, Changes Made

Hello, Frank here.

Well, it's Saturday evening, the eggs are in the incubator, and the temperature is stable at 99 degrees. I would like for it to be just a hair warmer, but I will address that Sunday morning.


I had to make a couple of changes. In my original incubator, the thermostat that controls the temperature malfunctioned. It operated fully open at about 113 degrees, way, way too hot. So, I got out an older incubator, identical to the first one, and replaced the original. It's thermostat works okay, so now we're good to go on that issue.

The other change was in location. The room in our house that I normally use to hatch birds is also the room we're starting seedlings in, so the temperature fluctuated too much. I moved them to a store room where the temperature is more constant. So, those were the two big changes I had to deal with. Other than that, everything is starting off normal. 

Friday afternoon I picked up a batch of eggs from a friend to include in this hatch. They are the brown eggs in the pictures. But the hens that laid these brown eggs used to live at our house. It's going to be interesting to see what type of babies they will produce, because all of the hens were standard mixed heavies and the rooster is a fine looking red Easter Egg breed.

 
Some of the pictures we have included show adding water to the troughs with the eggs in the turner in the incubator. When I started the eggs this morning at about 9:00 am, the turner was at an angle, which is not the best time for me to add water. It's difficult to hit the little trough, it's easier to add water when the turner is level. That's one of the reasons I put the black mark in the bottom of the trough. As I mentioned in the last post, some incubators are a lot easier to refill than the one that I have. But, this is what I have and this is what I'm going to use.
 
When you put your system together, you'll have to run the wire from the turner out of the incubator. Make sure it's in there so it runs out of the slot that is pre-cut in the incubator. If you do
use a turner, make sure all the little plastic trays are in the holes that they need to be. Also try to keep the turner slightly away from the edges so it can turn freely. This is part of the reasoning why you test everything with a dry run ahead of time.


The old incubator that didn't work? I'll keep it because the heating element still works. 


The circulating fan is fine. The styrofoam container itself is still good and solid. 


A word to the wise here, though. This is styrofoam and it will break easily. Trust me, I know. If your little boy wants to climb up on it, which little boys like to do, then you might be going through the whole process again, and not because you wanted to.

I bought a 12 volt incubator last year that I haven't used yet. It has the water trough that is easier to fill. It's one of those round-to-it things. I just haven't gotten around to it yet. I believe I mentioned it and put a link in a previous post.


Now for the next 21 days I'm going to watch the incubator very closely. Some things to look for. Keep your temperature as close as you can, and I shoot for 99.5 degrees. Always make sure your troughs have water. Never let them go empty. If you have an egg that had a crack in it that you didn't notice? In a few days it will start to stink, really stink. Also, after 18 days you will need to remove the turner. This is an easy enough process. Make sure the turner is nice and level, and very gently remove it with the eggs in it. We'll talk a whole lot more about this as the time approaches. This is not the time to drop an egg. But, again, we'll talk more about that as the time gets near.

Read your instructions again. Keep little fingers away from the thermostat. It's a good idea if only one person makes adjustments. Reason being, you don't want to have just increased the temperature and two minutes later someone else comes along and increases the temperature. Avoid direct sunlight, this thing will heat up just like a greenhouse. Avoid drafts, know where your heater and air conditioning duct vents are.

So, for the next 18 days, just pay attention. Because in 21 days, I don't care how many eggs I've hatched, I find it to be a fascinating experience. I think I mentioned this before, but hatching eggs is an excellent opportunity to teach reproduction and gestation in a short period of time. Even the youngest kids can understand the need for a rooster and a hen and how the egg develops. I believe this gives kids a much better understanding and respect for birth. I have yet to meet an adult that didn't think that hatching an egg, and watching it hatch wasn't a unique experience. 


Unless something comes up in the next few days, I won't be checking in about chickens for a couple of weeks, but there are some things you're going to need: feed, water, containers for both, and a warm, draft free home when your babies do hatch or arrive in the mail. And don't forget, you'll need to give them their first drink. So plan ahead and be prepared.


We'll talk more later. Frank.


Wednesday, February 12, 2014

Firing Up The Incubator

Hello, Frank here.

Thought I would give you a brief update with our chicken hatching project. I've been saving eggs now for a couple of days.
 
Dating the eggs with a pencil

Today I got out my incubator and egg turner. I want to make sure the equipment works okay. So that's where we are right now.


We have a variety of thermometers we have collected along the way.

Saturday morning I will start the eggs in the incubator for their 21 day hatch cycle. But, you have to do prep work ahead of time. A quick review here. My plan is to gather eggs for five days before starting the incubator. I started yesterday on the 11th. I will gather eggs the 12th, 13th and 14th, which is Tuesday through Friday. I know earlier I said five days, but in this case I have a friend that is also saving eggs, so I should have more than enough. Come Saturday morning, I will choose the newest and best looking eggs for the incubator. So, what do I do with the old eggs I don't use? I cook them up for my dog and cats.

At this stage, my incubator thermostat is not cooperating. I've done everything like I'm supposed to do, which is, fill up the water troughs. By the way it's real hard to see water in those little troughs. So I mark the bottom of mine with a magic marker so I can at least know where the trough is.
Along the way I will show you pictures of what I am talking about, because when you have the turner and it's filled with eggs, depending on what brand of incubator you have, it can be a little difficult to get the water in the trough. I also set my incubator on something I can afford to get a little wet in case I spill some water and it drains out of the holes in the bottom of the incubator. Food for thought.

Then put the automatic turner in the incubator, because it's motor produces heat.....But I can't get the temperature down below 109 degrees. I've unplugged it and restarted it, and it's still running way too hot. I'll do some checking and tinkering, but if this continues, I will replace the incubator with my other back up incubator. So, we'll see how that works out. 

But right now, I'm saving eggs and I've turned them half a dozen times today. Which in this case means I have tilted up one end or the other of an egg carton. This is a highly technical procedure, and only those highly trained and certified should use this technique. By the way, I have been sick for a while, and I can tell I'm feeling better, because my humor is returning.

Okay, back to chicken stuff. I'm starting this incubator Saturday, February 15th. 21 days later, March 8th, or actually March 7th, which is a Friday and a Saturday, the baby chicks will hatch. These days are the same days that the baby chickens I ordered from a hatchery will also be hatched. And the baby chickens, or as I will call them, day old chicks, will arrive at the post office about Monday, March 10th. This way, the store bought babies and the homegrown babies will be the same age. 

The friend I mentioned earlier that I'm also getting eggs from, she has my last generation hens, which is a mixture of Barred Rock, Buff Orpington, Partridge Rock, Speckled Sussex and maybe some that slipped my memory right now. But most of them were Barred Rock. Those are the hens. The rooster she has is an Easter Egg or Araucanas, a beautiful red rooster.

All of my eggs are from Easter Egg hens with one rooster. And with the introduction of the store bought chicks which are Black Australorps, this should offer a very interesting blend of chickens. So that's how we're going to do it this time. After I hatch these birds, they will be my replacement birds for the ones I have now. Shortly after my birds hatch, I will start another batch of my friend's eggs and mine for her to use as she sees fit.

So, with this hatch and the store bought ones, we are probably going to have 50 to 60 day old chicks. That will give me about 25 hens and 25 roosters. I'll keep about 20 hens and one rooster which leaves me with 24 roosters that I can put in the freezer or can. We have just started canning meat the last year or two, and I find tremendous satisfaction eating high quality meat, and knowing where it came from and what it was fed.

So, along the way, I'll keep you up to date with what I do with the incubator, which isn't a whole lot, but it's very important. It's important to keep the temperature correct and the humidity adequate. And along the way I will start preparing a home for my new day old chicks, which is a separate experience in itself. If you have any questions, let me know. Chickens are easy to raise, easy to butcher, great eating, they're my favorite livestock. Most people agree that they taste better than armadillo. 


We'll talk more later. Frank 


P.S. Keep the box that your incubator came in. And when you're finished, clean up your incubator and put it back in the same box. Now listen here very closely. Read the instructions that came with the incubator, and then read them again. And when you box up your incubator at the end of incubating season, put your instructions back in the same box. This is important. Keep the box. Read the instructions. Keep the instructions. Then next year, do the same thing again.

Friday, December 27, 2013

Chickens Hatching and Incubating

Hello, Frank here.

Hope everybody had a nice Christmas. I know personally a few turkeys that did not enjoy the Christmas season, but they were yummy.


As we talked earlier, there is no perfect chicken breed. Some birds may give you all the eggs you want, some might give you a nice big carcass with lots of meat, but it's like a lot of things in life, you need to find something that you like and try it. Don't forget that in your preparation, birds are going to need so much square footage inside the chicken house. The general recommendation is about four square feet per bird. I like to use five. You can get by with a whole lot less if the birds are out foraging all day. The chickens that I raise, which are called Easter Egg chickens, would not walk on snow covered ground. So, my little birds were happy to stay in the house while that white stuff was on the ground. 


It is seriously a good time to order your chickens if you are going to use a hatchery. As time gets nearer to March and April you will see a lot of breeds sell out. So, I would not waste a whole lot more time. If you have a neighbor or friend that raises chickens, you can get a styrofoam incubator and hatch your own, which is going to be the topic today, how to hatch your own birds. But first, I want to remind you of a few other things. Remember when you are picking out birds, or breeds, that is, always remember that birds can scare little kids. Like I said earlier, I know adults to this day, that are afraid of chickens because of something that happened in their childhood. So if you have little guys around your chickens, take care of them. It's also a time to consider less aggressive breeds. 

When your baby birds come, no matter how you get them, from the local feed store or through the mail, be prepared. Make sure you have tested your equipment. I can't say this enough, these are babies, so have feed, have water, have everything you are going to need and make sure you have tested all of your equipment. Temperature is critical for these little guys. And don't forget, you'll have to give them their first drink. Pay attention for the first couple of weeks for a crusted vent, or poopy butt. 

Okay. On to today's topic. Let's say you have a buddy down the road that raises chickens. He has a flock of birds that you like and that he likes and he'll be happy to save you up about four dozen eggs. A little side note here. Lots of hatcheries sell eggs for hatching. I have never tried this technique, but if it didn't work, they wouldn't sell them. Food for thought. But I have hatched eggs from my own chickens and some of my friends and neighbors chickens. So, here is the way I do it.


Whoever is saving the eggs for you, whether you pick them up every day and take them home, or your buddy does it for you, it doesn't make any difference. Get you about six empty, clean egg cartons. The eggs need to be as close to fresh as possible. Let's say your buddy gets 12 eggs a day he can spare. Clean the eggs off, the excess poop and dirt, but do not wash them. An old toothbrush comes in handy here, but be gentle. Don't under any circumstances use your wife's toothbrush if she is not looking. If the eggs have wet poop on them, let it dry and brush it off very gently. DO NOT refrigerate the eggs and DO NOT wash the eggs. Keep them at room temperature.

Okay, you've got your eggs, they're clean. Take a pencil, not a pen or magic marker, and put the date on the top of the egg. Today for example is: 12-27. You say, "Which end is the top?" Well, the pointed end is the bottom. This is very important. The pointed end goes down. According to G.Q.F. Manufacturing, "During incubation, eggs must be turned several times a day to prevent the yolk from setting to one side and to exercise the embryo." You have 12 nice clean eggs, dated with the pointed end down. Take one of your empty cartons and put it under one end of your full carton. That means it will be raised up maybe two inches. Six or seven times a day, move the empty 
carton to the other end, therefore, effectively rotating those 12 eggs. When you go to bed, do it then. When you get up, do it then also. And a handful of times during the day. If you don't have enough eggs to fill a whole carton, just space them around evenly. If you're not home during the day, when you get home, do it then. When you get your next dozen eggs, do the same procedure and you can put two dozen eggs on that one empty carton. Continue doing this until you have four dozen eggs. The fresher the eggs, the better your hatch rate. So if your buddy gets 40 eggs a day, then you'll have all the eggs you need in two days.

Okay. What now? I have always used a rectangular, styrofoam type
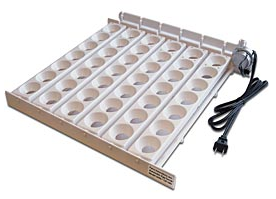
incubator. You can pick these up at your local feed store or you can buy them online. The basic styrofoam unit has a top, a bottom and some type of temperature control with a heating element. It will come with a thermometer and a tray or screen for the baby chickens to stand on when they hatch. Some come with a fan inside to move the air around. Some come with an automatic egg turner that will tilt the eggs back and forth so you don't need to. All of the styrofoam incubators will have water troughs in the bottom. This is to help maintain proper moisture content. If you go with a complete package, test it before you start saving eggs and make sure it
works. Also test to make sure your incubator doesn't leak. If you got the automatic turner, put it inside the incubator and run it for a couple of days, along with the incubator. Reason being, everything you add to the incubator, like the fan and the automatic turner, both produce heat. So you will need to adjust your incubator temperature accordingly. A little bonus here. If you decide to buy the automatic turner, put the eggs in the automatic turner with the top of the incubator off, completely off not just turned off, but removed. Instead of doing the egg carton routine, the automatic turner will keep your eggs rotated for you. Do you have to have the automatic turner? Absolutely not. But it is a very handy tool.


Okay. So you have your eggs, don't forget the date in pencil.
They're clean with the pointed end downward. Most automatic turners hold 41, 42 or 48 eggs, something like that. You have tested your incubator's temperature with the egg turner in it. Okay. Now let's go. Put the top on with the eggs in it. I would do this on a Saturday morning, that is if you have weekends off. Watch the temperature very, very closely. Some instructions recommend 99.5 degrees, others recommend 99.9 degrees. I shoot for 99.5 degrees. Some will say this is too cool. This is one of those times where opinions differ. 

It takes chicken eggs 21 days to hatch. The last three days you will need to turn the turner off and remove it. This is no big deal. Open the lid, lift the turner out and place the eggs back into the incubator. Don't drop one. Okay. This is a good time to mention washing your hands. Don't handle your eggs any more than you need to. Wash your hands before you do, because the egg shell is porous. Good point for your kids to do the same thing too.

Now your eggs have been in the incubator for 18 days. You have kept the temperature set at 99.5 degrees. Every couple of days along the way you have filled the water troughs up. The birds are starting to produce their own heat. You might have excess humidity develop. Follow the instructions that came with the incubator. Most incubators come with little plugs for holes for ventilation. Keep the instructions. Read them and follow them. You should start hearing cheeping sounds. Remember these are baby birds and they don't understand clucking yet, so you will need to start cheeping. No joke. If you will cheep, they will answer you.


These last three days do not disturb the eggs. One day you will look through the viewing window of your incubator and if your viewing window is too wet, your humidity is too high and you just had some birds hatch.
When your birds start hatching, your humidity level will rise quickly. You will start to notice peck holes on the eggs. A baby chick has a little bitty chisel on it's beak. It will start by making a peck hole and then it will work it's way around the top of the egg. Be patient. Some chicks will hatch in a matter of minutes, others will take a couple of hours. Not trying to be funny here, but it's kind of like labor. It will push and push and it will eventually come out of the egg. This is one of the reasons for the moisture. The chick has to be able to move around inside of the egg. When it does hatch, it will lay there for a while. It may have some goo attached here and there. Do not under any circumstances help the bird out of the shell. Also do not remove any empty shells until the bird has completely cleared from the shell. 

Wa-la! Your first born. What now?

Some birds will hatch a whole day before anyone else hatches. Just leave the bird in the incubator, it's fine. When you have a half a dozen baby chicks running around, and they are good and dry, kind of fluffy looking,
gently tilt the lid up, grab your new baby chicken and give it a drink. Do that with the next four or five that are good and dry, or mostly dry. This is a good time to remove the empty shells also. Do this quickly because your heat and humidity are leaving your incubator and any chicks laying there are getting chilled. With practice you'll get better. More hands are sometimes better, too. Again, gently tilt the top up, have your helper grab the baby chicks, give them a drink, and you can do this one at a time, and remove the empty egg shells. When you take these birds out, you need to put them in your prepared brooder with appropriate water, feed and heat. We talked about brooders last time. Remember, these guys are just babies. Their brooder has to be dry, warm, draft free and predator free. Dogs and cats love baby chickens, too.

Okay, continue this process for a day or two. Then you're going to have to determine how much longer you're going to wait. The vast majority of the chickens will hatch in one day. A couple will be early, a few will be late. So what do you do about the guy that's late, he got a peck hole going all the way around his shell, but he just can't push out? That's a tough question. General accepted policy is to not assist chickens during birthing. The concept is you will help produce a weaker strain of chickens.
My recommendation is gather up all the eggs that didn't hatch or in the process of hatching and get rid of them. After the majority of your chickens have hatched, wait one more day. This is always difficult, but that's part of raising animals. And this is just my recommendation. If you want to, wait two days. I have hatched hundreds and hundreds of baby chickens and my experience is that if a chicken doesn't hatch within two days of hatch date, they are not going to. And if they do, they normally have some type of problem. So, put them in one of those Wal-Mart type baggies and put them in your outside trash and get rid of them and don't look back. 

When you are finished hatching, clean your incubator immediately. And remember when you are cleaning it that it is styrofoam. Be gentle. This incubator works well sitting still, but if you try to sling out the moisture after washing, you will have a handful of styrofoam still in your hand, and the incubator on the ground. Trust me. Please do not wash down the electrical components. A nice gentle wipe will do well here. I have some of these gizmos that have lasted for years. Keep the original box, get it good and clean and dry, put it back in the box and it's good to go next year. If you're going to use it again immediately, still clean it up and follow the instructions. Remember, the box that you kept and didn't throw away?
 
What you've just done is start your 6, 12 and 18 month cycle. In 6 months the hens will start to lay. In one year you can hatch their eggs again. In 18 months, if you choose, you can replace your adult birds. If you have a certain hatch date that you want, and you're going to start saving eggs, your incubation time is 3 weeks. Plan accordingly. Use the freshest eggs you can, test your equipment and be prepared. The birds you just hatched will provide you with meat and eggs, generation after generation.

One topic we didn't cover. If you choose not to use an automatic turner, when you are ready to start incubating the eggs, use a pencil and place  
an 'X' on one side. Lay the eggs down flat with the 'X' up, and every three or four hours, turn the eggs over with the 'X' down. When going over night, try to alternate 'X' down one night, 'X' up the next night, and follow the same time frame, temperature and humidity. You can get more eggs in the incubator if you do not use an automatic turner. Again, make sure your hands are clean since you will be handling them more often. Everything else is the same after hatch date. Remember, don't turn the eggs the last three days.

You will get about half and half, male to female. Your hatch rate might be anywhere from 50% to around 90%. Use well shaped eggs. In about 12 weeks be prepared to butcher the roosters. Some roosters you will butcher earlier and some you will butcher later, depending on the breed. Let's say you have 42 eggs in an incubator and you get an 80% hatch rate. That will give you about 32 birds, about 16 roosters and 16 hens. In about 12 weeks you butcher 14 of the roosters. Now you have 2 roosters and 16 hens. In about three more months, depending on the breed, you will start getting about 12 to 14 eggs a day. In about six more months, you do the whole thing over again. Ta-da!


For you folks that live off the grid, I have located a 12 volt VDC incubator. Here's the website. But, don't be fooled by the 12 volt AC turner. It is AC. So, food for thought. Something to play with.

 
If you're going to do this little experience, you need to have solid plans soon. About how many chickens do you want? What breed? Do you want to have a rooster? What kind of chicken coop are you going to buy or build? And you need to just get prepared. Hope this helps.


We'll cluck more later. Frank 

P.S. Don't forget to practice clucking, or in this case, cheeping.