Reusable Food Wrap
I discovered reusable food wrap almost a year ago, but I'm just now getting around to making some. It's like most things I begin to research, once I get started, it's amazing how much information is out there, and much of it has been published for the sole purpose of sharing with others. This is another instance that I am benefiting from the experience and know how of other folks.
Here are some of the sites I found that led me on this particular leg of my journey in learning.
The really amazing thing about this project is how quick and easy it was, once I had completed my research and obtained some beeswax. From the time I gathered the materials, until I had produced a useable wrap took about 20 minutes for the first one, and even less time for the second one. Most of the time was spent figuring out how big I wanted to cut the fabric and how to get the beeswax pellets to stay consistently spread out.
Here is how it went. First, I chose a piece of fabric. This was a small piece that I have had around for quite sometime thinking it would come in handy for something. And besides that, it has hearts on it and I think it's pretty. Then I rounded up the pinking shears and the box of beeswax.
After I ran across the sites that discussed how to make these reusable wraps with beeswax, I then began researching bulk beeswax. My first thought was to buy a block of wax, figuring it would be more economical. What I found out was that small pellets, or pastilles, cost much less than the blocks, so I compared many different sites and chose one that had the best deal for wax and shipping. I bought my wax quite some time ago, but I have included the link for that site.
The next step was to figure out what size to make the wrap. I have several large bowls I do a variety of things with that I frequently cover with plastic wrap, like this bowl of coleslaw. I turned the larger bowl upside down and gauged the size from that. The smaller bowl, with the coleslaw in it, I eyeballed right side up.
The temperature recommended by most sites is 150 degrees or the lowest setting your oven will go. I started the oven preheating while I figured out what to do next.
I used pinking shears to cut the fabric to help prevent raveling. Although, I figured impregnating the fabric with beeswax would take care of any tendency to unravel. Next, I covered my largest cookie sheet with a piece of foil that was larger than the fabric. Several sites recommend parchment paper instead of foil, but I don't use parchment paper. The foil worked just fine. I folded up the edges of the foil to keep any stray beeswax pellets from escaping, or any melted wax from dripping off and onto the bottom of the oven.
Since my fabric was wider than my cookie sheet and tended to sag a little in the middle, I placed a smaller cookie sheet upside down on the large cookie sheet for support. This helped to keep the beeswax from rolling to the middle of the fabric.
 You can tell from reading the linked articles that the first time you try this, adding an adequate amount of beeswax involves guesswork. This is how much I put on the first piece of fabric.
I set the timer for seven minutes, and gathered up a couple of hangers and some clothes pins. Then I cut the second smaller piece for the coleslaw bowl. Before I knew it, the first one was finished.
The directions say to remove the fabric from the foil immediately, and they are right. If you don't the beeswax will start solidifying very quickly and your fabric will stick to the foil. It is hot, so be careful. One end of the first one did stick a little because I took the time to take this picture to show you the small puddles of excess wax. I put too much on the first piece, but not way too much. It gave me an idea of how much less to put on the second piece.

 I hung the wrap up on the hanger and left it to dry while I got the second piece ready and put it in the oven. While it was 'baking' I put away the wax and fabric, then took the first piece down to play with.
 When the second piece was done, I found one area without any wax. There were a few small puddles of wax on the foil, so I soaked up some of this excess wax in the bare spot. That seemed to work okay. I think I will be able to tell how well it worked after I use it for a while.
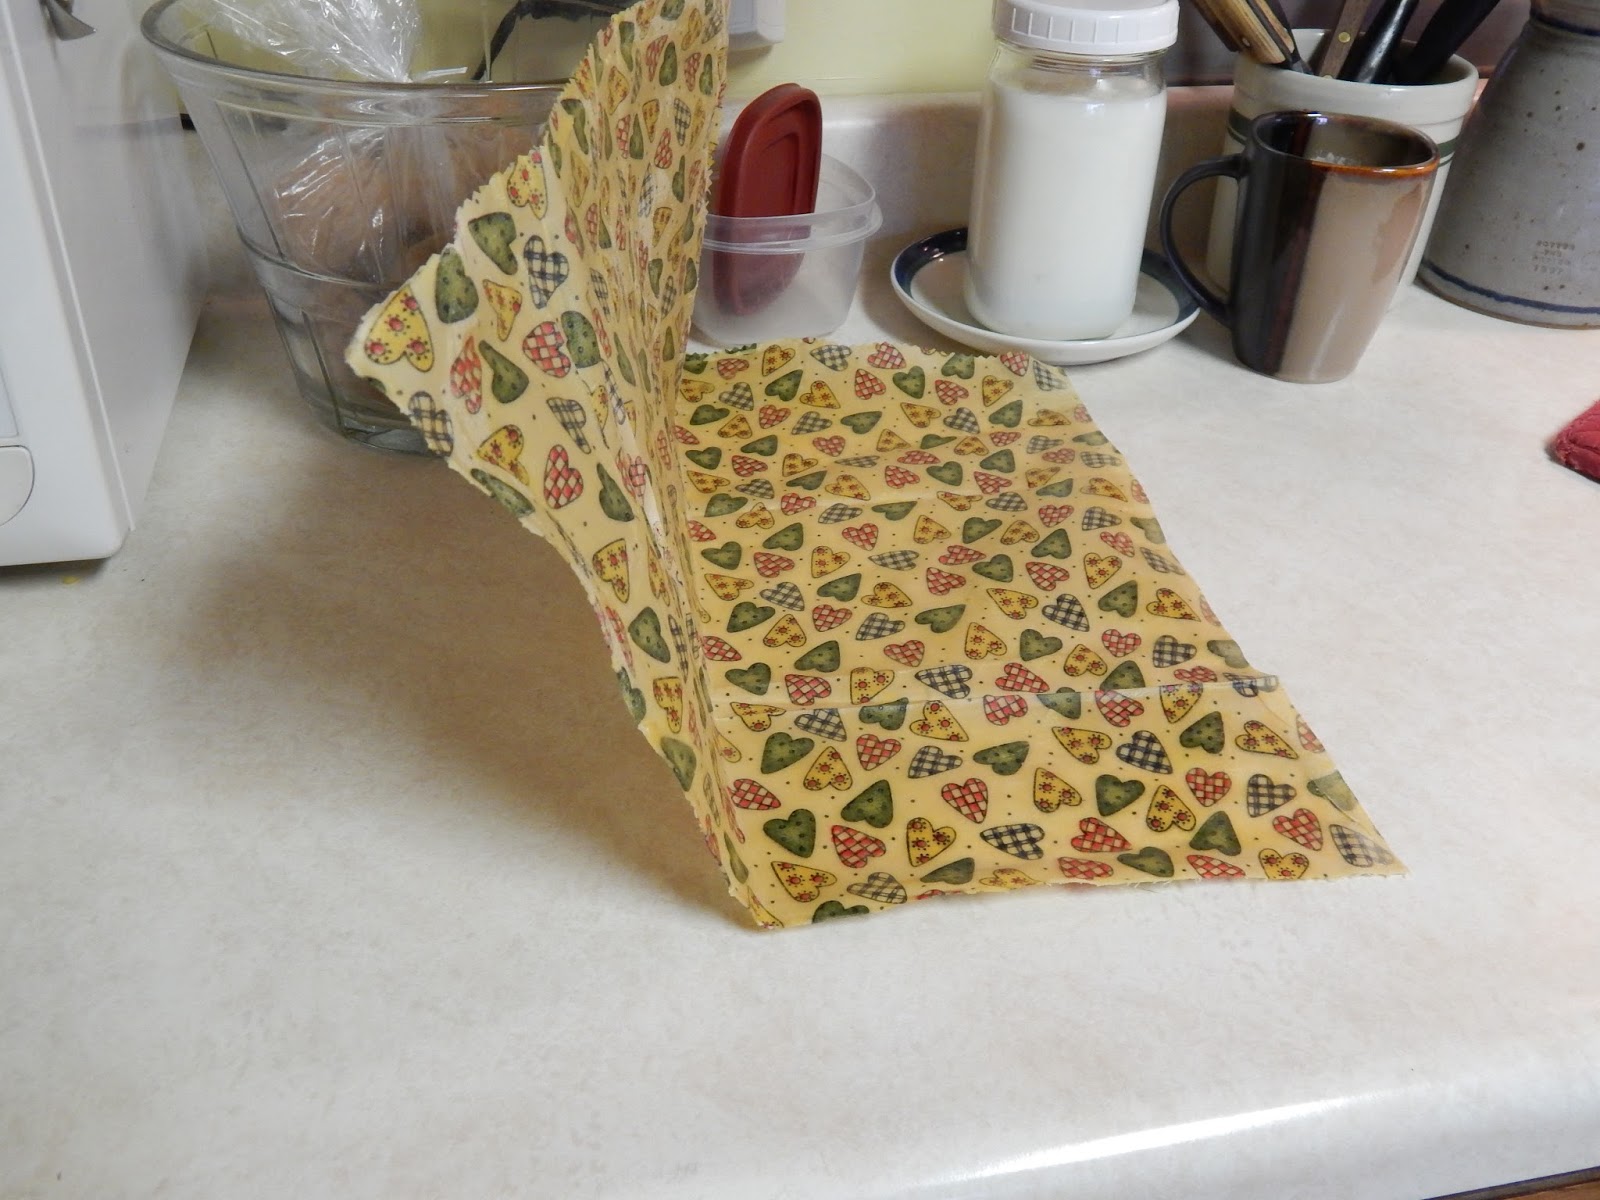 The fabric turns out kind of stiff. I could stand it up on edge, or fold it, and it would hold it's shape. But at the same time, it is very flexible and will keep whatever shape you give it.
 The directions say to use the warmth of your hands to shape it to a bowl or pan. This works very well, surprisingly so.
This larger piece of fabric will work on a large mixing bowl or on a 13 x 9 baking dish.
I have yet to use these. I will let you know what I think after I have tried them out for a while. I expect them to get soiled and stained during use, but that doesn't seem to be a problem. The directions for cleaning are to rinse in cold water and rub with a dishcloth as needed. Don't use hot water, since it will cause the wax to start melting. These wraps cannot be used on hot pans since it will cause the beeswax to melt, but it should work great on leftover casseroles, bread while it rising or many other dishes, like that bowl of coleslaw.
One of the things that attracted me to this project was the use of beeswax. It is a natural product with no chemical or synthetic components. What would make it even better, is producing it ourselves from our own bees, but if that ever happens, it is a long ways down the road.
Learning. I talked about it just recently. It can be a lot of fun or a drudgery. Learning is what you make it. As a teacher, it was a challenge to try to make learning fun for my students. I wasn't always successful. But one thing I always tried to model was a love of learning. When I found something to be fascinating, or could make it funny and enjoyable, my students tried so much harder to learn. Maybe that's one of the reasons Frank and I love to learn. We long ago developed an attitude that led to a life long experience of learning. And I am grateful we did.
Until next time - Fern


What an ingenious idea. I hadn't heard of this before. I love learning about new things.
ReplyDeleteMy reaction was the same as yours when I first ran across this idea, Kathi. I am grateful for all of the folks that share what they know and do, otherwise there are so many things I would never have known.
DeleteFern
I have never heard of this either, what a great idea. My grandmother was an inveterate plates for lids lady and she had all these mismatched plates she used as lids for bowls in the fridge which also allowed her to stack things. This is pretty as well as useful! I want to try this myself - thanks for the post!
ReplyDeleteYou're welcome, Kathy. You know, being able to stack things using plates is also a very good idea! So, thank you for sharing and letting me learn yet another new thing.
DeleteFern
Again perfect timing...I wonder about plastic wraps for food and it is one more thing to throw away...i was wondering about how to wrap foods without it and lo and behold you post this! Thank you.
ReplyDeleteThere are so many things we throw away after one use, Fiona. I think the more I look into this, the more I will find. I haven't run across reusable wrap for freezing items in, but I bet there's one out there. I know some folks wash and reuse plastic bags of all kinds, but after a while, they won't seal anymore. Thank you for sharing.
DeleteFern
Very interesting. I'd like to know how they store in warm/hot/humid weather like we have in FL. Will the bees wax start to soften? Will wait for further reports from you and will probably google this on my own.
ReplyDeleteI have wondered the same thing, Bellen. It gets really hot and humid here in the summer, so I will have to see how they do. Of course, we use the AC for now, so it shouldn't be a problem. But, I do wonder how they will work if the power is out for an extended period of time. I'll let you know how they work out.
DeleteFern
Fern - this is brilliant! i have never heard of this before but yer darn tootin's i am going to give this a go! i hate saran wrap, but like you have several mixing bowls that don't have lids. also stocking saran wrap and the like is great if SHTF, but what happens when you run out? i also love learning and i love it even more when it comes from a trusted source, such as your blog and all of the blogs in my blogroll. it's a wonderful thing when someone shares information simply to let other people know about it. yours is a great blog for that!
ReplyDeleteyour friend,
kymber
When I found these sites where other women were making wraps, I thought it was great too, Kymber. You're right about running out of things when the SHTF. I've thought about that many times. Thank you for sharing a different perspective.
DeleteFern
Fern, I use a small paint brush to spread out the melted wax immediately, after removing it from the oven. That way, there's no hits and misses with the beeswax. The brush can only be used for future beeswax cloth since you'll never get it out of the bristles. lol As you go along, you'll learn that less beeswax works just as well because of using the paintbrush. And make sure it's 100% cotton material. It soaks up the beeswax better.
ReplyDeleteThank you for sharing more techniques to make this project more successful, Lotta Joy. I think all of the sights I looked at recommended 100% cotton, too. I have a cheese wax paint brush that is only dedicated to cheese. I'm sure your beeswax paint brush is about the same thing. Thank you very much for sharing this information.
DeleteFern
I was so happy to find a fellow blogger who does this! Out of 100 who say "I think I'll do that too!" 99 are just talking. I'm into EVERYTHING, and my main goal is to learn at the feet of others. Even things like peeling eggs get me excited: http://littlelottajoy.blogspot.com/2014/11/instant-peel-boiled-eggs.html
DeleteDry canning: http://littlelottajoy.blogspot.com/2014_10_01_archive.html
And beeswax? Sweetie, you're going to love this page: http://littlelottajoy.blogspot.com/2014/11/biting-off-more-than-i-can-chew.html
I'm putting your blog on my blogroll because people like you are a rarity. You don't pretend to be interested in odd things. You ARE interested and make the effort to teach others.
Thank you for the fun links, Lotta Joy. I especially like the beeswax adventure you had. I haven't tried making soap....yet. But it is on my list. Thank you very much for the kind words. Have fun peeling eggs!
DeleteFern
I've looked into this, but haven't actually done any research yet, so thanks! ;-)
ReplyDeleteWhat I'm really looking for is a way to store home baked bread without having to use zip lock bags. Maybe I could sew up some bags and put the beeswax on them.
I read you blog consistently and love it.
Making a bread bag is one of my next projects, MissV. Most of the sites I have read recommend storing bread in cloth bags, some made of cotton, but most made of linen. No beeswax or any other additives are needed. Here is a link with more information that I will be using when I get some made and write about it.
Deletehttp://1840farm.com/2012/10/the-best-way-to-store-fresh-bread/
I'm glad you enjoy your time here. Thank you very much for the comment.
Fern
I was thinking of doing this just the other day. Thanks for the tutorial!
ReplyDeleteLinda, when you get some made, let me know how they work. Thank you for the comment.
DeleteFern
Thank you Fern!! I had heard of and looked into the reusable wrap, but thought it was crazy expensive. I don't know why I didn't realize I could make it myself! I have (tons of) fabric and beeswax already on hand so I am definitely going to try this. I have been trying to move away from plastic in the kitchen, and it is very hard! Until I started to think about the change I never realized how much of the time our food comes in contact with plastic.
ReplyDeleteI am also super excited about the bread bag link you posted above. Again, why didn't I think of that?!? I make homemade bread, then slice it and put it in a plastic freezer bag. I have recently read several blog posts about how linen is even better than cotton as a dishtowel for the kitchen because it is so absorbent. I used a coupon and placed an online order for some linen, so I am going to turn part of it into bread bags. Thank you!!
Machelle, I have run across quite a few things and wondered, why didn't I think of that?! That's one of the things I love about learning. By the way, I made bread bags out of linen today. I'll post it in a few days. Thank you for sharing.
DeleteFern
Grandma did this the easy way. Lay a piece of cloth out on a warmed cookie pan and scrape a chunk of wax over it all over. Wad the cloth up and scrunch it around to make it pliable. Lay it back on the warmed pan, waxed side down, and again scrape the chunk of wax all over it. Use a flat-edged spatula to get any excess wax off (it really doesn't require much, and the retrieved wax can be blobbed back onto the original chunk to cool and use again.) To clean the wax cloth just lay it on the counter and swab off with the soapy dish cloth while doing dishes. Rinse in cool water and hang.
ReplyDeleteHeavy felt ponchos or jackets with hoods were waxed this way on one side only to wear in the rain. Wax, scrape, wax again. Outside waterproof, inside soft and warm.
This is great information, Blue. I really appreciate the technique of laying out the wrap on the counter and cleaning it with a soapy dishcloth. Great idea! Thank you for sharing these jewels of wisdom with us.
DeleteFern
This is a great idea, economical, environmentally friendly and simple. Thanks for sharing - Visiting from the Home Acre Blog Hop. Have a wonderful and healthy Christmas!
ReplyDeleteThank you for coming over to visit, Marla. Have a blessed Christmas.
DeleteFern