
Hope everybody had a nice Christmas. I know personally a few turkeys that did not enjoy the Christmas season, but they were yummy.

As we talked earlier, there is no perfect chicken breed. Some birds may give you all the eggs you want, some might give you a nice big carcass with lots of meat, but it's like a lot of things in life, you need to find something that you like and try it. Don't forget that in your preparation, birds are going to need so much square footage inside the chicken house. The general recommendation is about four square feet per bird. I like to use five. You can get by with a whole lot less if the birds are out foraging all day. The chickens that I raise, which are called Easter Egg chickens, would not walk on snow covered ground. So, my little birds were happy to stay in the house while that white stuff was on the ground.

It is seriously a good time to order your chickens if you are going to use a hatchery. As time gets nearer to March and April you will see a lot of breeds sell out. So, I would not waste a whole lot more time. If you have a neighbor or friend that raises chickens, you can get a styrofoam incubator and hatch your own, which is going to be the topic today, how to hatch your own birds. But first, I want to remind you of a few other things. Remember when you are picking out birds, or breeds, that is, always remember that birds can scare little kids. Like I said earlier, I know adults to this day, that are afraid of chickens because of something that happened in their childhood. So if you have little guys around your chickens, take care of them. It's also a time to consider less aggressive breeds.

Okay. On to today's topic. Let's say you have a buddy down the road that raises chickens. He has a flock of birds that you like and that he likes and he'll be happy to save you up about four dozen eggs. A little side note here. Lots of hatcheries sell eggs for hatching. I have never tried this technique, but if it didn't work, they wouldn't sell them. Food for thought. But I have hatched eggs from my own chickens and some of my friends and neighbors chickens. So, here is the way I do it.

Whoever is saving the eggs for you, whether you pick them up every day and take them home, or your buddy does it for you, it doesn't make any difference. Get you about six empty, clean egg cartons. The eggs need to be as close to fresh as possible. Let's say your buddy gets 12 eggs a day he can spare. Clean the eggs off, the excess poop and dirt, but do not wash them. An old toothbrush comes in handy here, but be gentle. Don't under any circumstances use your wife's toothbrush if she is not looking. If the eggs have wet poop on them, let it dry and brush it off very gently. DO NOT refrigerate the eggs and DO NOT wash the eggs. Keep them at room temperature.


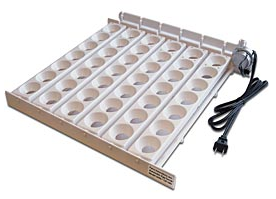
Okay. What now? I have always used a rectangular, styrofoam type

Okay. So you have your eggs, don't forget the date in pencil.

It takes chicken eggs 21 days to hatch. The last three days you will need to turn the turner off and remove it. This is no big deal. Open the lid, lift the turner out and place the eggs back into the incubator. Don't drop one. Okay. This is a good time to mention washing your hands. Don't handle your eggs any more than you need to. Wash your hands before you do, because the egg shell is porous. Good point for your kids to do the same thing too.
Now your eggs have been in the incubator for 18 days. You have kept the temperature set at 99.5 degrees. Every couple of days along the way you have filled the water troughs up. The birds are starting to produce their own heat. You might have excess humidity develop. Follow the instructions that came with the incubator. Most incubators come with little plugs for holes for ventilation. Keep the instructions. Read them and follow them. You should start hearing cheeping sounds. Remember these are baby birds and they don't understand clucking yet, so you will need to start cheeping. No joke. If you will cheep, they will answer you.
These last three days do not disturb the eggs. One day you will look through the viewing window of your incubator and if your viewing window is too wet, your humidity is too high and you just had some birds hatch.

Wa-la! Your first born. What now?
Some birds will hatch a whole day before anyone else hatches. Just leave the bird in the incubator, it's fine. When you have a half a dozen baby chicks running around, and they are good and dry, kind of fluffy looking,

Okay, continue this process for a day or two. Then you're going to have to determine how much longer you're going to wait. The vast majority of the chickens will hatch in one day. A couple will be early, a few will be late. So what do you do about the guy that's late, he got a peck hole going all the way around his shell, but he just can't push out? That's a tough question. General accepted policy is to not assist chickens during birthing. The concept is you will help produce a weaker strain of chickens.

When you are finished hatching, clean your incubator immediately. And remember when you are cleaning it that it is styrofoam. Be gentle. This incubator works well sitting still, but if you try to sling out the moisture after washing, you will have a handful of styrofoam still in your hand, and the incubator on the ground. Trust me. Please do not wash down the electrical components. A nice gentle wipe will do well here. I have some of these gizmos that have lasted for years. Keep the original box, get it good and clean and dry, put it back in the box and it's good to go next year. If you're going to use it again immediately, still clean it up and follow the instructions. Remember, the box that you kept and didn't throw away?
What you've just done is start your 6, 12 and 18 month cycle. In 6 months the hens will start to lay. In one year you can hatch their eggs again. In 18 months, if you choose, you can replace your adult birds. If you have a certain hatch date that you want, and you're going to start saving eggs, your incubation time is 3 weeks. Plan accordingly. Use the freshest eggs you can, test your equipment and be prepared. The birds you just hatched will provide you with meat and eggs, generation after generation.
One topic we didn't cover. If you choose not to use an automatic turner, when you are ready to start incubating the eggs, use a pencil and place

You will get about half and half, male to female. Your hatch rate might be anywhere from 50% to around 90%. Use well shaped eggs. In about 12 weeks be prepared to butcher the roosters. Some roosters you will butcher earlier and some you will butcher later, depending on the breed. Let's say you have 42 eggs in an incubator and you get an 80% hatch rate. That will give you about 32 birds, about 16 roosters and 16 hens. In about 12 weeks you butcher 14 of the roosters. Now you have 2 roosters and 16 hens. In about three more months, depending on the breed, you will start getting about 12 to 14 eggs a day. In about six more months, you do the whole thing over again. Ta-da!

For you folks that live off the grid, I have located a 12 volt VDC incubator. Here's the website. But, don't be fooled by the 12 volt AC turner. It is AC. So, food for thought. Something to play with.
If you're going to do this little experience, you need to have solid plans soon. About how many chickens do you want? What breed? Do you want to have a rooster? What kind of chicken coop are you going to buy or build? And you need to just get prepared. Hope this helps.
We'll cluck more later. Frank
P.S. Don't forget to practice clucking, or in this case, cheeping.
The only thing I can add is that when you start saving your eggs and they are in the egg cartons waiting to be set that we start turning them immediately. Just flip the carton over in the morning and again at night before bed until they are set.
ReplyDeleteI raise chicken every year from my own eggs and butcher the extras. I replace my laying hens every other year.
I have a question. I have 7 eggs in my incubator, they were laid under one of my mommas that we were letting have one baby while she was off the nest one day, we have no idea how long they were under her. When the baby she was hatching hatched, we put the rest in our incubator, they have been in there for around two weeks. We have two that are starting to look dark, but there is no smell. Could this be that these two are getting ready to hatch and that we can see the wet feathers? I appreciate any insight.
ReplyDeleteHello. There's really no way to know what is happening with your eggs. If you wait one more week, and it's already been two weeks, then your eggs should hatch if they're going to hatch. The last two days of that seven day period, quit turning the eggs, assuming that you have been. That will give you your full cycle. Those last three or four days, also increase your humidity. If your birds hatch, wonderful. If they don't, then very gently put them in a bag and dispose of them as you see fit. Or, you can take them to your neighbors house and drop them on the front porch. That's your call. Let us know what happens.
DeleteFrank