The Road Home

The Road Home
There is no place like home.

Tuesday, December 31, 2013

Squash Patties

While I was rummaging around for something to cook for supper, I decided it would be nice to have a meal of some of the things we grew last summer. This was one of those days when nothing in particular sounded good, so it took a little imagination to come up with something.


We canned a bunch of yellow squash last summer just to have another alternative food and a different set of nutrients on the shelf. I have used it in a casserole or two and in a pot of soup. This time I remembered a recipe my mom gave me about 20 years ago, when she gave me a few jars of squash she had canned.

I picked out a jar of purple hull peas and a jar of squash. This should make a good meal. It doesn't look like much, though, does it?


Well, the peas I just dumped in a pan to heat up. Easy enough.


Then I dug through my recipes hoping I still had the one for squash patties. Here it is.


Drain the squash........ 


........then mash it up until smooth. Well, kinda smooth.


Add:
1 egg
1 tbsp. sugar
1/2 tsp. salt
A dash to 1/4 tsp. pepper (to taste)
2 tbsp. milk
2 tbsp. onion (I used dried)
1/2 c. flour
1/2 tsp. baking powder

Stir well. Cook in a skillet like pancakes with a little oil.


This was very easy and tasted good. One of the patties could have cooked a little longer, so make sure yours are done. I also think this would be good with half cornmeal and half flour. It would change the flavor a little. Out of one pint of squash, I got six patties. Just right for us.


I wonder if I will ever ceased to be amazed at the meals I can make from a few little seeds, some time and some work. I hope not. 


It's a wonderful little miracle that just tickles me to death. Frank has become used to me sitting down at the table to eat and saying, "Neat-o! This food came from our dirt, right out there. Isn't that great?" We are blessed.


Until next time - Fern

Monday, December 30, 2013

Garlic Honey, Anyone?

Yep, that's what everyone needs, some garlic flavored honey. Very strong garlic honey. So strong when you open the jar the smell knocks you down. You think I'm kidding, right? I'm not.

Many years ago, I don't remember when, Frank and I came across some information about the benefits of infusing, for lack of a better word, honey with garlic for medicinal purposes. The benefits of honey and garlic go back as far as man has been keeping records, so there is no surprise there. But as a review, I will include some of the many advantages of including these two items in your diet.


According to Herbal Antibiotics some of the medicinal uses and properties of honey include: 
  • can be applied directly to a wound
  • used internally for immune stimulation 
  • treatment of colds, flu and respiratory infections
  • expectorant
  • anti-inflammatory
  • anticarcinogenic
  • promotes healing of peptic ulcers and bacterial gastroenteritis
  • good for gingivitis
  • NEVER give honey to babies under one year old due to the chance of botulism 


The Illustrated Encyclopedia of Healing Remedies outlines some of the medicinal properties of garlic which include:
  • Garlic strengthens the immune system as well as helps to fight chest infections, coughs and congestion. I - See more at: http://www.naturalblaze.com/2013/04/10-amazing-health-benefits-of-garlic.html#sthash.ly8rF1zy.dpuf
    cleanses the blood
  • helps bring down fever
  • antiseptic
  • antibiotic
  • antifungal
  • tones the heart and circulatory system
  • boosts the immune system
  • may help to reduce high blood pressure
  • may prevent some cancers, in particular stomach cancer
  • treats infections of the stomach and respiratory system
  • helps prevent heart disease and reduces the risk of atherosclerosis
  • antioxidant
  • decongestant

When we first started using our garlic honey mixture we mainly used it as a cough/cold medicine. Now the more I read about it, the more I realize how beneficial it would be to consume it everyday. Since I have been having some sinus problems lately I have been taking it everyday, several times a day, which means it is time to fix up another batch.
 
The jar on the right is the one we are currently using.

Our daily kefir and my new sourdough starter are sitting in the background.
It is a very simple process. Take one whole head of garlic, and use all of the cloves. This is some of the garlic we grew last summer. Since they are pretty small heads, I am using several of them instead of just one large head. Peel the cloves.

Fill a quart jar about 3/4 full of honey. We prefer to use local honey, but this time I am using up some store bought honey we stocked up on right after we moved here. We have since been able to locate a source of local honey, but we need to use this up as well.


Put the cloves in the honey.


Stir it up to coat the cloves.


Set it back out of the way. Stir it up every few days for a couple of weeks. When you open the jar and the garlic-y smell is so strong it just about knocks you down, it's ready.  I usually leave the garlic cloves in the honey until they are kind of mummified looking or until they are just in the way too much. We don't eat them, I just throw them away. I have debated about cooking something with them, but I never have. They get pretty wrinkled up and look rather dead.

To use this wonderful concoction, just get a spoonful and eat it. The first few times you do this you might gag a little. It depends on how sensitive you are. We have been eating it for so long that we don't really notice it much. Not that it tastes that great, it's just worth it. Now, I would recommend you be strategic in the timing of taking this elixir. If you are going to have company over, you might want to wait until they are gone, unless, of course, you want them to leave quickly.  Just be aware of how fragrant you may become after partaking of a dose.


This is just another one of those things that we can do for ourselves instead of relying on others to provide us with something that may have numerous side effects that we may, or may not even know about. We feel the more we can eliminate medications, over the counter or prescription, the better our health will be. This is not always possible, but we can try to the best of our ability. Some day soon, we may not have a choice in the matter. 


Until next time - Fern


Garlic strengthens the immune system as well as helps to fight chest infections, coughs and congestion. I - See more at: http://www.naturalblaze.com/2013/04/10-amazing-health-benefits-of-garlic.html#sthash.ly8rF1zy.dpuf

Saturday, December 28, 2013

Radio - Are You Listening?

Hello, Frank here.

Whether you're a listener or a talker, radio has something for you. If you read this site for entertainment, that's good. If you read it to increase your knowledge base a little, that's even better. If you read this site because you know and can see what is coming, then that's what we're going to talk about today.

We're going to talk about listening, be it AM/FM commercial radio, shortwave, scanner, ham radio these are all good areas to listen. You'll
basically need two radios. First, being a scanner. Now some areas signals that you would normally scan are going digital, which means a normal analog scanner will not pick up those signals. But, many, many areas are not going digital. What I am talking about here are police, fire and ambulance, because it just plain and simple costs too much. Along with the increased costs, many municipalities are finding they have increased their
inability to communicate effectively. So, before you buy a digital scanner, which right now, they are somewhat pricey, check and see what your local guys use. You can buy a good, functional analog scanner for around $100 new. A good, functional digital scanner costs around $400 and up, new. Why a scanner? Your newer scanners can pick up CB radio, VHF/UHF ham frequencies, GMRS, FRS, MURS, aircraft traffic, police, fire, rescue, school buses, railroads, Coast Guard, utility vehicles and the list goes on. A handy tool! 

The next radio will be some form of shortwave listening radio, SWL. You can buy a fair SW for around $100 and the price goes up. My recommendation is contact your local ARRL and tell them that you're
looking for a used HF radio. HF means high frequency. Unlike scanner traffic, SW may be coming from 10 miles to 10,000 miles away. You need a piece of equipment that is a little more sensitive. Even if you can pick up an HF radio from a ham operator that does not transmit, for whatever reason, but it still receives, then you are getting a finer piece of equipment than you will with most shortwave radios. The frequency bands are the same for HF ham and SW listening. And the bonus in this case will be that you can also pick up the ham side bands. Remember, this post is for listening purposes only. 

If you want to improve your reception dramatically, then you will need an outside antenna. For your scanner, a simple discone type antenna will work great. For your shortwave radio, the longer the wire, the better. I will include resources and diagrams. 


Shortwave connectors: This is a part of a dipole antenna. Take the center piece, the coax from here connects to your radio. This center piece needs to be as high as you can get it. Go to any hardware store and buy 12/2 or 14/2 insulated electrical wire. This is standard house wiring. You do not need flexible. Cut the wire to the maximum length that you can have it going outward, the ends connecting to the little insulators need to connect to poles also. The higher the better. In the ham world you need to
be fairly precise with the length for transmitting. It's also important for receiving, but not critical. Have the ends as high as you can get them also. Avoid going over metal structures, but if you don't have a choice, go ahead and do it. Connect rope to the end of the insulator, but do not pull it rigid tight.
These next two items apply to your coax connection. One is an exterior tape, the other one is an inside goo type stuff. This will help keep moisture out of your connector. If you need help, contact the folks at ARRL.
Mounted on a single pole, this will give you a more than adequate ability to listen. You will need coax cable running from each antenna to your radios. You will also need a very simple power supply, because it takes very little energy to listen. This would be an excellent place for a small solar panel with a charge controller and a battery. You can put both antennas on the same antenna pole and you can listen to almost any signal being broadcast, be it local or long distance.

A good AM/FM radio will come in handy also. Most SW radios will receive AM radio, but something I have learned along the way, no matter how good your radio or your antenna, if there is not a signal there, you are not going to receive it. At my house, I cannot pick up local AM commercial radio and that means no Rush Limbaugh. I am broken hearted. Okay. Back to reality.

Why do you want to receive radio? News, weather, sports, military movement, dams breaking, local disasters, check point locations, icy roads, where the bus is parked gathering people, what is happening two states over. With this listening radio set up, with a little bit of practice and a little bit of knowledge, you will be able to know what is happening on the
east coast or west coast, and that's from people on the scene. You will also know what's happening locally. You can hear CB traffic, and you say, "Why would I want to listen to that foul mouth type talk?" Because we're talking about an emergency crisis situation. Those ole' boys running mega watts of power from who knows where will no longer be on the air. And if they are, you might want to know what's happening five states over, from a simple CB radio. Whatever they're talking about might be heading in your direction.

You might say here, "Why doesn't this guy just stick with radio facts and information?" Because there are hundreds of internet sites that will teach you how to get your ham license. This site is to help you get prepared for what is unquestionably coming. If you can't see it, I am sorry. But there have been way, way too many things happen in the last few years that solidly indicates that significant changes are not just on the horizon, but they are happening as you read this.


A side note here. Yes, I have a ham radio license. I do not contest, and many days I don't turn my radio on. My wife and I communicate 
around our farm with handheld radios that anybody can buy. Being ham radio operators, we also have radios in our cars. So can you. Our house is also set up with ham radio equipment. And if you could care less about ham radio, you can still listen.
Example. A couple of nights ago, I was listening to my CB radio, and yes, I have a nice CB antenna and a nice CB radio. I was not on SSB, this was regular CB AM channel 28. I listened to a guy in Portland, Oregon from southeast Oklahoma, just as clear as a bell. If you want to be able to communicate with your neighbors, CB radio is the way to   
go. Or, you can use GMRS/FRS. GMRS according to the FCC requires a license. I have never met a person to this day who has one. You don't know what GMRS is? It's those little two way walkie talkies that hunters use and children play with. I can't stress enough the importance of having communications. Whether you want to listen only, which is what most people do. Or you want to go the talking route with CB and GMRS. Or you want to get your ham radio license. You are going to want to be able to communicate when this thing comes upon us.

Okay, what is this thing I am talking about? Religion, church is under attack. Schools, public education has been under attack for years. Now, all of our medical records are going to be under attack, and this little issue is going to extend out in ways we have not even thought of yet. Our military is under attack from the inside out. Agriculture and the agricultural industry
 has been under attack for years, imagine GMO foods. And if you don't know what I'm talking about, then you need to pull your head out of the sand. Look at privacy and security. There are no private phone calls or email messages for that fact. Look at political correctness, what we say and can't say. Look at the 2nd Amendment. Did you know that there will be no more lead bullets
manufactured in this country? Do you know what NSA is? Do you know what NDAA is? Have you taken your little girl to an airport lately and let some guy feel her chest and put his hand in her crotch? And we stand there as parents and let this happen? And then that same guy does the same thing to your wife? Feels her chest and gropes her crotch? We call this freedom? Do you know what TSA means? These folks are now setting up check points at ballgames, shopping malls and interstate highways. Are you aware that police do not need search warrants anymore? Have you looked at some of the vehicles our local police departments have been given by Homeland Security?

Wake-y! Wake-y! people. Look at our banking system. Try going into a bank and withdrawing a large amount of your money. You will be questioned as to why you want it or need it. If it's above a certain
amount, you'll have to fill out a form. Did you know that you cannot pay for a new automobile with cash? When you go to buy a house, you have to provide a financial statement of where your money is coming from. Wall Street. The Federal Reserve Bank is propping up our currency and Wall Street to the tune of approximately $86 BILLION dollars per month. Yes, that's BILLION with a big 'B'. PER MONTH. Unemployment is out of control,
but we are told by the government controlled news media that everything is getting better. Example here. A man that used to work 50 hours per week at $20.00 per hour and is now working 30 hours per week at $8.00 per hour is considered gainfully employed. Suicide is now one of the largest killers in this country. Think about that. Pharmaceuticals. A huge percentage of people are taking prescription, mind altering, legal drugs every day. And this is only a partial list with no detail.

Now wasn't that pleasant? If you can't see what is coming, or if you choose not to see, then I pray that someday you wake up real soon, because all of the above mentioned topics are occurring while you read this. If you want communications and you have the desire and
financial means, you can still go to the store or go online and buy these items. But one day, you're not going to be able to. It appears to me, and this is just a personal observation, that there are lots and lots of people that do not want to deal with reality. I really don't know what's going to happen to all of these people, but I don't think it's going to be pleasant. Folks, all I deal with here is communications. I don't talk about food storage, beans and bullets, gold or silver, just communications. It's time to get it done. Go back and read the other posts, there is lots of non-technical information provided. I hope this helps.


We'll talk more later. 73, Frank


Friday, December 27, 2013

Chickens Hatching and Incubating

Hello, Frank here.

Hope everybody had a nice Christmas. I know personally a few turkeys that did not enjoy the Christmas season, but they were yummy.


As we talked earlier, there is no perfect chicken breed. Some birds may give you all the eggs you want, some might give you a nice big carcass with lots of meat, but it's like a lot of things in life, you need to find something that you like and try it. Don't forget that in your preparation, birds are going to need so much square footage inside the chicken house. The general recommendation is about four square feet per bird. I like to use five. You can get by with a whole lot less if the birds are out foraging all day. The chickens that I raise, which are called Easter Egg chickens, would not walk on snow covered ground. So, my little birds were happy to stay in the house while that white stuff was on the ground. 


It is seriously a good time to order your chickens if you are going to use a hatchery. As time gets nearer to March and April you will see a lot of breeds sell out. So, I would not waste a whole lot more time. If you have a neighbor or friend that raises chickens, you can get a styrofoam incubator and hatch your own, which is going to be the topic today, how to hatch your own birds. But first, I want to remind you of a few other things. Remember when you are picking out birds, or breeds, that is, always remember that birds can scare little kids. Like I said earlier, I know adults to this day, that are afraid of chickens because of something that happened in their childhood. So if you have little guys around your chickens, take care of them. It's also a time to consider less aggressive breeds. 

When your baby birds come, no matter how you get them, from the local feed store or through the mail, be prepared. Make sure you have tested your equipment. I can't say this enough, these are babies, so have feed, have water, have everything you are going to need and make sure you have tested all of your equipment. Temperature is critical for these little guys. And don't forget, you'll have to give them their first drink. Pay attention for the first couple of weeks for a crusted vent, or poopy butt. 

Okay. On to today's topic. Let's say you have a buddy down the road that raises chickens. He has a flock of birds that you like and that he likes and he'll be happy to save you up about four dozen eggs. A little side note here. Lots of hatcheries sell eggs for hatching. I have never tried this technique, but if it didn't work, they wouldn't sell them. Food for thought. But I have hatched eggs from my own chickens and some of my friends and neighbors chickens. So, here is the way I do it.


Whoever is saving the eggs for you, whether you pick them up every day and take them home, or your buddy does it for you, it doesn't make any difference. Get you about six empty, clean egg cartons. The eggs need to be as close to fresh as possible. Let's say your buddy gets 12 eggs a day he can spare. Clean the eggs off, the excess poop and dirt, but do not wash them. An old toothbrush comes in handy here, but be gentle. Don't under any circumstances use your wife's toothbrush if she is not looking. If the eggs have wet poop on them, let it dry and brush it off very gently. DO NOT refrigerate the eggs and DO NOT wash the eggs. Keep them at room temperature.

Okay, you've got your eggs, they're clean. Take a pencil, not a pen or magic marker, and put the date on the top of the egg. Today for example is: 12-27. You say, "Which end is the top?" Well, the pointed end is the bottom. This is very important. The pointed end goes down. According to G.Q.F. Manufacturing, "During incubation, eggs must be turned several times a day to prevent the yolk from setting to one side and to exercise the embryo." You have 12 nice clean eggs, dated with the pointed end down. Take one of your empty cartons and put it under one end of your full carton. That means it will be raised up maybe two inches. Six or seven times a day, move the empty 
carton to the other end, therefore, effectively rotating those 12 eggs. When you go to bed, do it then. When you get up, do it then also. And a handful of times during the day. If you don't have enough eggs to fill a whole carton, just space them around evenly. If you're not home during the day, when you get home, do it then. When you get your next dozen eggs, do the same procedure and you can put two dozen eggs on that one empty carton. Continue doing this until you have four dozen eggs. The fresher the eggs, the better your hatch rate. So if your buddy gets 40 eggs a day, then you'll have all the eggs you need in two days.

Okay. What now? I have always used a rectangular, styrofoam type
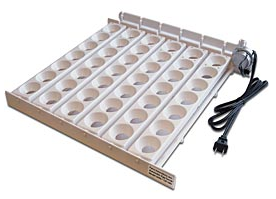
incubator. You can pick these up at your local feed store or you can buy them online. The basic styrofoam unit has a top, a bottom and some type of temperature control with a heating element. It will come with a thermometer and a tray or screen for the baby chickens to stand on when they hatch. Some come with a fan inside to move the air around. Some come with an automatic egg turner that will tilt the eggs back and forth so you don't need to. All of the styrofoam incubators will have water troughs in the bottom. This is to help maintain proper moisture content. If you go with a complete package, test it before you start saving eggs and make sure it
works. Also test to make sure your incubator doesn't leak. If you got the automatic turner, put it inside the incubator and run it for a couple of days, along with the incubator. Reason being, everything you add to the incubator, like the fan and the automatic turner, both produce heat. So you will need to adjust your incubator temperature accordingly. A little bonus here. If you decide to buy the automatic turner, put the eggs in the automatic turner with the top of the incubator off, completely off not just turned off, but removed. Instead of doing the egg carton routine, the automatic turner will keep your eggs rotated for you. Do you have to have the automatic turner? Absolutely not. But it is a very handy tool.


Okay. So you have your eggs, don't forget the date in pencil.
They're clean with the pointed end downward. Most automatic turners hold 41, 42 or 48 eggs, something like that. You have tested your incubator's temperature with the egg turner in it. Okay. Now let's go. Put the top on with the eggs in it. I would do this on a Saturday morning, that is if you have weekends off. Watch the temperature very, very closely. Some instructions recommend 99.5 degrees, others recommend 99.9 degrees. I shoot for 99.5 degrees. Some will say this is too cool. This is one of those times where opinions differ. 

It takes chicken eggs 21 days to hatch. The last three days you will need to turn the turner off and remove it. This is no big deal. Open the lid, lift the turner out and place the eggs back into the incubator. Don't drop one. Okay. This is a good time to mention washing your hands. Don't handle your eggs any more than you need to. Wash your hands before you do, because the egg shell is porous. Good point for your kids to do the same thing too.

Now your eggs have been in the incubator for 18 days. You have kept the temperature set at 99.5 degrees. Every couple of days along the way you have filled the water troughs up. The birds are starting to produce their own heat. You might have excess humidity develop. Follow the instructions that came with the incubator. Most incubators come with little plugs for holes for ventilation. Keep the instructions. Read them and follow them. You should start hearing cheeping sounds. Remember these are baby birds and they don't understand clucking yet, so you will need to start cheeping. No joke. If you will cheep, they will answer you.


These last three days do not disturb the eggs. One day you will look through the viewing window of your incubator and if your viewing window is too wet, your humidity is too high and you just had some birds hatch.
When your birds start hatching, your humidity level will rise quickly. You will start to notice peck holes on the eggs. A baby chick has a little bitty chisel on it's beak. It will start by making a peck hole and then it will work it's way around the top of the egg. Be patient. Some chicks will hatch in a matter of minutes, others will take a couple of hours. Not trying to be funny here, but it's kind of like labor. It will push and push and it will eventually come out of the egg. This is one of the reasons for the moisture. The chick has to be able to move around inside of the egg. When it does hatch, it will lay there for a while. It may have some goo attached here and there. Do not under any circumstances help the bird out of the shell. Also do not remove any empty shells until the bird has completely cleared from the shell. 

Wa-la! Your first born. What now?

Some birds will hatch a whole day before anyone else hatches. Just leave the bird in the incubator, it's fine. When you have a half a dozen baby chicks running around, and they are good and dry, kind of fluffy looking,
gently tilt the lid up, grab your new baby chicken and give it a drink. Do that with the next four or five that are good and dry, or mostly dry. This is a good time to remove the empty shells also. Do this quickly because your heat and humidity are leaving your incubator and any chicks laying there are getting chilled. With practice you'll get better. More hands are sometimes better, too. Again, gently tilt the top up, have your helper grab the baby chicks, give them a drink, and you can do this one at a time, and remove the empty egg shells. When you take these birds out, you need to put them in your prepared brooder with appropriate water, feed and heat. We talked about brooders last time. Remember, these guys are just babies. Their brooder has to be dry, warm, draft free and predator free. Dogs and cats love baby chickens, too.

Okay, continue this process for a day or two. Then you're going to have to determine how much longer you're going to wait. The vast majority of the chickens will hatch in one day. A couple will be early, a few will be late. So what do you do about the guy that's late, he got a peck hole going all the way around his shell, but he just can't push out? That's a tough question. General accepted policy is to not assist chickens during birthing. The concept is you will help produce a weaker strain of chickens.
My recommendation is gather up all the eggs that didn't hatch or in the process of hatching and get rid of them. After the majority of your chickens have hatched, wait one more day. This is always difficult, but that's part of raising animals. And this is just my recommendation. If you want to, wait two days. I have hatched hundreds and hundreds of baby chickens and my experience is that if a chicken doesn't hatch within two days of hatch date, they are not going to. And if they do, they normally have some type of problem. So, put them in one of those Wal-Mart type baggies and put them in your outside trash and get rid of them and don't look back. 

When you are finished hatching, clean your incubator immediately. And remember when you are cleaning it that it is styrofoam. Be gentle. This incubator works well sitting still, but if you try to sling out the moisture after washing, you will have a handful of styrofoam still in your hand, and the incubator on the ground. Trust me. Please do not wash down the electrical components. A nice gentle wipe will do well here. I have some of these gizmos that have lasted for years. Keep the original box, get it good and clean and dry, put it back in the box and it's good to go next year. If you're going to use it again immediately, still clean it up and follow the instructions. Remember, the box that you kept and didn't throw away?
 
What you've just done is start your 6, 12 and 18 month cycle. In 6 months the hens will start to lay. In one year you can hatch their eggs again. In 18 months, if you choose, you can replace your adult birds. If you have a certain hatch date that you want, and you're going to start saving eggs, your incubation time is 3 weeks. Plan accordingly. Use the freshest eggs you can, test your equipment and be prepared. The birds you just hatched will provide you with meat and eggs, generation after generation.

One topic we didn't cover. If you choose not to use an automatic turner, when you are ready to start incubating the eggs, use a pencil and place  
an 'X' on one side. Lay the eggs down flat with the 'X' up, and every three or four hours, turn the eggs over with the 'X' down. When going over night, try to alternate 'X' down one night, 'X' up the next night, and follow the same time frame, temperature and humidity. You can get more eggs in the incubator if you do not use an automatic turner. Again, make sure your hands are clean since you will be handling them more often. Everything else is the same after hatch date. Remember, don't turn the eggs the last three days.

You will get about half and half, male to female. Your hatch rate might be anywhere from 50% to around 90%. Use well shaped eggs. In about 12 weeks be prepared to butcher the roosters. Some roosters you will butcher earlier and some you will butcher later, depending on the breed. Let's say you have 42 eggs in an incubator and you get an 80% hatch rate. That will give you about 32 birds, about 16 roosters and 16 hens. In about 12 weeks you butcher 14 of the roosters. Now you have 2 roosters and 16 hens. In about three more months, depending on the breed, you will start getting about 12 to 14 eggs a day. In about six more months, you do the whole thing over again. Ta-da!


For you folks that live off the grid, I have located a 12 volt VDC incubator. Here's the website. But, don't be fooled by the 12 volt AC turner. It is AC. So, food for thought. Something to play with.

 
If you're going to do this little experience, you need to have solid plans soon. About how many chickens do you want? What breed? Do you want to have a rooster? What kind of chicken coop are you going to buy or build? And you need to just get prepared. Hope this helps.


We'll cluck more later. Frank 

P.S. Don't forget to practice clucking, or in this case, cheeping.